My main activity of 2019 was a port of the Mental Canvas 3D drawing tool from Windows to iOS. About 75% of my effort was user interface code, maybe 15% on graphics and 10% other platform issues.
What’s interesting about our porting approach? Well, it’s just an unusual mix:
It’s a UWP (Universal Windows Platform) app. UWP was Microsoft’s effort to modernize Win32 and add iOS mobile paradigms, so it is already touch-centric, relatively sandboxed and has a more mobile-like lifecycle
We didn’t use React Native, Flutter, Electron, Xamarin, Qt or even Fuschia’s namesake Pink. We just… wrote some native code. And a lightweight abstraction layer.
We completed the porting effort in seven months, with three developers.
We stayed with the MVVM architecture that is the norm on Windows. Many iOS developers would call that… exceptionally ok
We didn’t use the latest and greatest Swift tools, just plain old C++11 and Objective-C for the most part. We didn’t switch to SwiftUI when it was released half way through our port.
What combination of circumstances led to this approach? Mostly just a real life constraint: a desire to rewrite/redesign as little working code as possible, and keep the codebase’s size down.
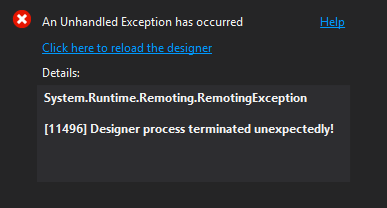
In September 2017, Microsoft released a rewritten XAML Designer program within Visual Studio. It’s only enabled for a tiny fraction of apps and got a very quiet launch, so almost no one knows about it. The new version runs as UwpSurface.exe instead of XDesProc.exe and is only enabled for UWP apps targetting Fall Creators Update SDK or newer. For my app, the new Designer simply broke everything initially. Why? Presumably for technical reasons, it only works with {Binding} and not {x:Bind} – but this was not made at all clear in the launch announcements. UWP developers have been encouraged to use {x:Bind}: it’s compiled, type-safe and faster, and x:Bind functions are the only way to do multibinding. For my 64-bit app, I never got design data or design instances working under XAML Designer (xdesproc), so I relied entirely upon {x:Bind}‘s FallbackValue parameter to preview different modes of my UI – but {Binding} has no equivalent mechanism. After a lot of tinkering, I’ve finally learned a few important things about the new XAML Designer, and got a usable workflow.
Top Takeaways
UwpSurface is much faster and stabler than XDesProc. The dialog above (“Click here to reload the designer”) is largely history.
It works for both 32-bit and 64-bit apps (x86 or x64), which is a big step forward
Only {Binding} is evaluated; {x:Bind} is completely ignored.
DesignInstances (a live ViewModel) can be attached via DataContext or d:DataContext, although the DesignInstance parameter doesn’t seem to work
ViewModel code executes, but I don’t see any indication that View code executes, despite discussion to the contrary in Microsoft’s launch blog post
For C++/CX apps: due to a bug, only single-class ViewModels (without any C++/CX base classes) work as of Visual Studio 15.8.x. They’re fine in C#. (Update Jan. 2019:Visual Studio 15.9 fixed this bug, but ViewModels that implement property change notifications still do not work.)
You can attach a debugger and see debug output from your ViewModel, or any exceptions. I haven’t been able to set breakpoints.
Update Jan. 2019: Visual Studio 15.9 added support for something I requested in mid-2018: the FallbackValue parameter was added to {Binding}, which makes that an equally viable way to work with XAML Designer. FallbackValue doesn’t work for {x:Bind} in the new Designer.
My strategy for a C++/CX app
Stick with {x:Bind} and its functions in most of my code
For the few properties that are central to a clean layout (usually about 2-5), use {Binding} and type converters
For those properties, build a duplicate “DesignTimeMock” ViewModel class – with no C++/CX base classes – and return the design-time property values there. Most properties can be safely omitted.
In the XAML code, define two different DataContexts like this:
This attaches one ViewModel for runtime, and the mock for design time.
Update Jan. 2019: Visual Studio 15.9 now allows a different approach: instead of a DesignTimeMock, you can just have a single DataContext using the “real” view model, but instead change {x:Bind} to {Binding} in the few places where it matters, and then add a FallbackValue parameter to choose the desired value in XAML Designer. The biggest advantage of FallbackValue: you can edit it in place and see it immediately update, without recompiling and relinking the DesignTimeMock view model.
It’s not ideal. But… it’s better than nothing.
Closing Thoughts
Despite the difficulties, I do look forward to further improvements in the XAML Designer. The old version was dated and crash-prone, and a clean slate rewrite was the only reasonable path forward. It’s just going to take some time to reach feature parity with the old version, which will mean some teething pain for “guinea pig” developers like myself.
I recently found a neat XAML user interface trick that I hadn’t seen in my usual resources. Suppose you have:
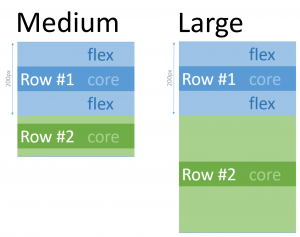
a grid-based responsive user interface that you want to grow/shrink to fit the window
suppose it has a fixed width, and each row has a “core” minimum height it needs.
then there’s some extra vertical space that you want to sprinkle around
you have some priorities – first give row #1 extra space, then row #2 any extra.
XAML makes it easy to do proportional space allocation – e.g., give row #1 two-thirds and row #2 one-third by giving them “2*” and “*” height respectively. But it doesn’t do priorities.
The trick: combine a massive star size with a MaxHeight. That looks like this:
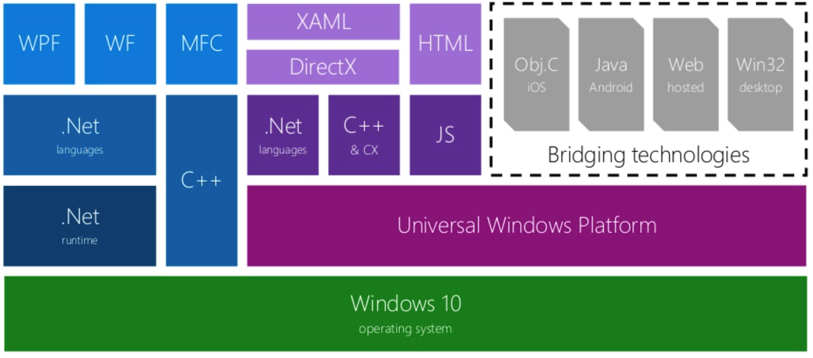
I’m a latecomer to Microsoft’s user interface technologies. I never used Windows Framework (WPF) on top of .net and I never used Silverlight on the web. The last year was my first taste of these tools through the XAML framework that is part of the “Universal Windows Platform” (UWP) – that is, the Windows 10 user interface layer (and Win8).
XAML has steadily evolved since the WPF days, and it took a little while to really understand the different major eras of the technology, especially since the UWP flavour of XAML strips out some of the older syntaxes in the name of efficiency on mobile platforms, better error checking at compile-time and code readability and ease-of-use. The technology’s old enough that much of the Google search hits and StackOverflow results are not applicable on the modern UWP platform.
My Tips
So what were a few of my first lessons when using XAML on UWP?